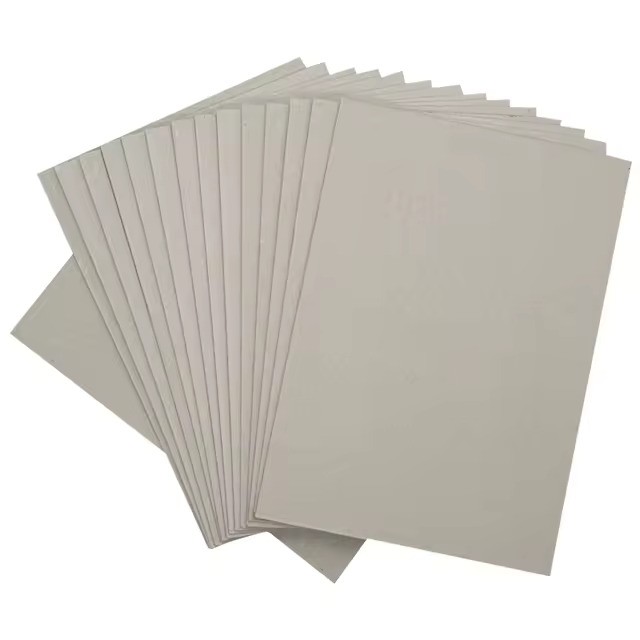
You can pick the right paper by thinking about your project. You should also think about what people expect. Thickness, size, and quality change how your work looks. They also change how your work feels. Thicker grey paper sheets feel nicer and last longer. The table below shows how these things affect print, strength, and price. Pick paper with the best finish and texture for your job. Match the color to look more professional.
| Aspect | Impact on Your Project |
| Print Quality | Thicker sheets soak up ink better. This makes colors and words look clearer. |
| Durability | Heavier paper does not tear easily. It also lasts longer. |
| Cost Considerations | Thicker paper costs more money. It can change your budget. |
Key Takeaways
Pick thicker grey paper if you want it to last. Thicker paper is stronger and feels nice for business cards. - Pick the right size to save money and not waste paper. Standard sizes work well with most printers and cutters. - Think about the quality of the paper you pick. A smooth finish and nice texture make your project look good. - Choose paper that fits what your audience wants. Heavier paper can impress people who want high quality. - Make a checklist before you buy paper. Check the size, weight, and finish so you do not make mistakes.
Key Factors for Paper Selection
When you choose the right paper for your project, you need to think about several important factors. The purpose of your project guides your decisions. You want your work to look good and last long. You also want to meet the expectations of your audience. Below, you will learn about thickness, size, and quality. These factors help you make smart choices during paper selection.
Thickness
Paper thickness changes how your project feels and lasts. If you use thicker paper, your work becomes stronger and more durable. Thicker sheets resist tearing and bending. You should pick thicker paper for items that people handle often, like business cards or covers. Thinner paper works well for flyers or notes that people use once.
Thicker papers are more durable and resist wear and tear.
Thinner papers suit one-time use and cost less.
Business cards printed on 300 gsm stock last longer and do not fray.
Thick thermal paper works well for receipts and labels because it lasts longer.
You can see the industry standards for paper thickness in the table below:
| Type of Paper | Weight (LBS) | Weight (GSM) |
| Office Papers and Writing Stock | 20 - 50 lb | 75 - 160 gsm |
| Text Papers | 60 - 100 lb | 89 - 148 gsm |
| Light Cardstocks | 58 - 70 lb | 157 - 190 gsm |
| Midweight Cardstocks | 80 - 100 lb | 216 - 280 gsm |
| Heavy Cardstocks | 110 - 130 lb | 298 - 352 gsm |
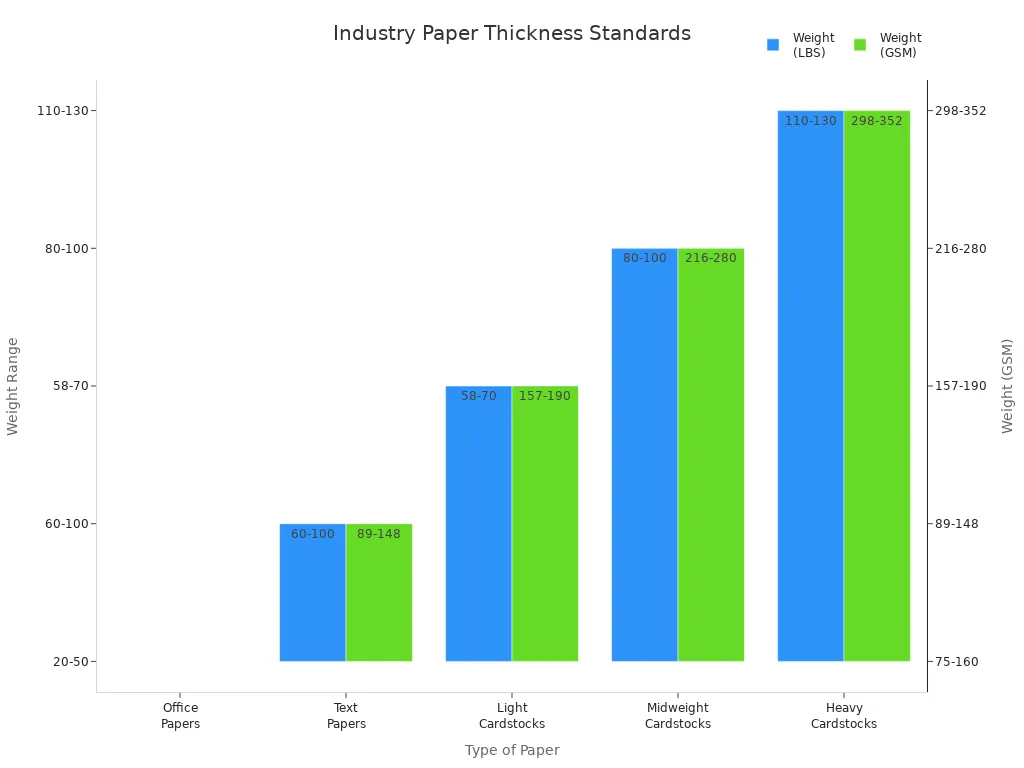
Tip: Always match paper weight to your project needs. Heavy paper costs more but lasts longer.
Size
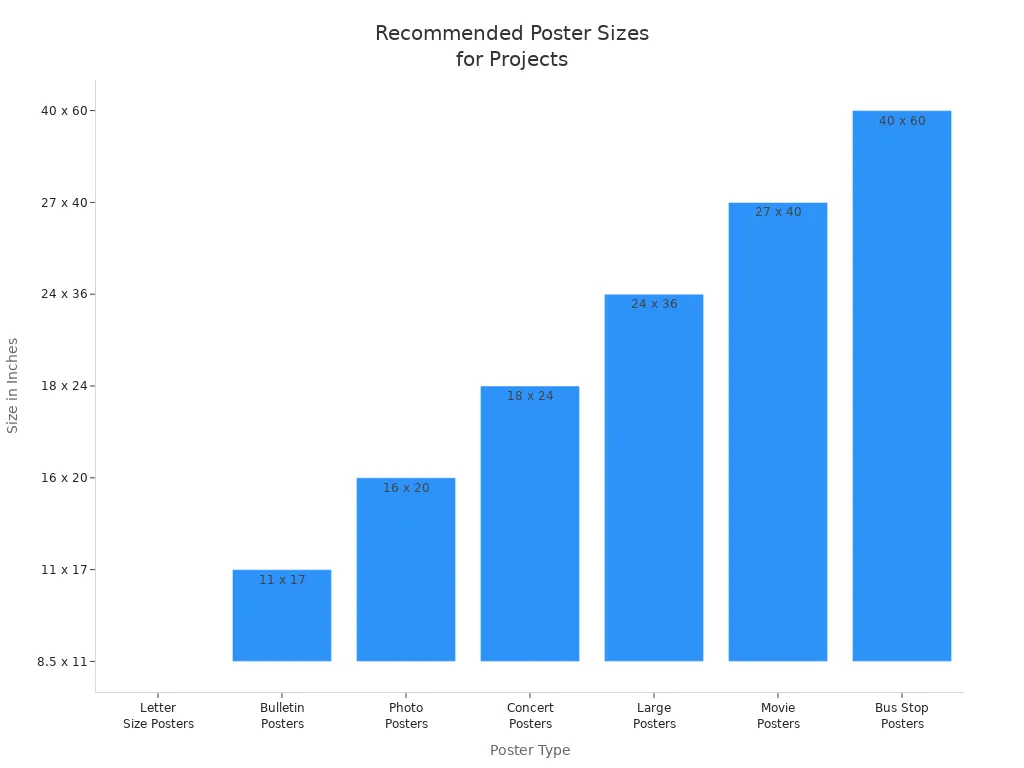
The size of your grey paper sheets affects how much material you use and how much you spend. Standard sizes work best with printers and cutters. You save money and reduce waste when you choose the right size. For posters, book covers, or model-making, you need to pick the correct dimensions.
| Common Name | Size in Inches | Size in Millimeters | Closest International Size | Closest International Size in Millimeters |
| Letter Size Posters | 8.5 x 11 | 215.9 x 279.4 | A4 | 210 x 297 |
| Bulletin Posters | 11 x 17 | 279.4 x 431.8 | A3 | 297 x 420 |
| Photo Posters | 16 x 20 | 406.4 x 508 | A2 | 420 x 594 |
| Concert Posters | 18 x 24 | 457.2 x 609.6 | B2 | 500 x 707 |
| Large Posters | 24 x 36 | 609.6 x 914.4 | A1 | 594 x 841 |
| Movie Posters | 27 x 40 | 685.8 x 10¹⁶ | B1 | 707 x 1000 |
| Bus Stop Posters | 40 x 60 | 1016 x 1524 | B0 | 1000 x 1414 |
Quality
Quality matters when you want your project to look professional and last longer. You need to think about finish, weight, absorbency, texture, and color matching. The finish, such as matte or glossy, changes how your work looks and feels. Coated paper gives a shiny look and helps ink stay on the surface. Uncoated paper absorbs ink and feels softer. Heavier paper weight makes your project feel more valuable. Absorbency affects how bright and clear your images appear. Texture changes the final look and feel. Smooth paper works well for printing detailed images. Color matching helps your project look neat and attractive.
Weight: Heavier paper handles more layers and techniques.
Sizing: Proper sizing makes your work easier and reduces extra steps.
Texture: The surface feel affects the final look.
Finish: Matte or glossy finish changes readability and style.
Note: High-quality grey paper sheets elevate your message. Poor paper selection can make your project look less impressive.
| Key Considerations | Description |
| Purpose and Use | Determines if the paper will be handled often or mailed, which affects thickness and durability. |
| Audience | High-end clients expect heavier, more luxurious paper. |
| Design | Heavy ink coverage needs thicker paper to prevent show-through. |
| Budget | Heavier paper costs more, so you need to balance quality and cost. |
Paper selection shapes your project from start to finish. When you review your options, ask yourself basic questions about your goals. The right paper helps your work stand out and last longer.
Choosing the Right Paper Thickness
Image Source: unsplash
Thickness Options
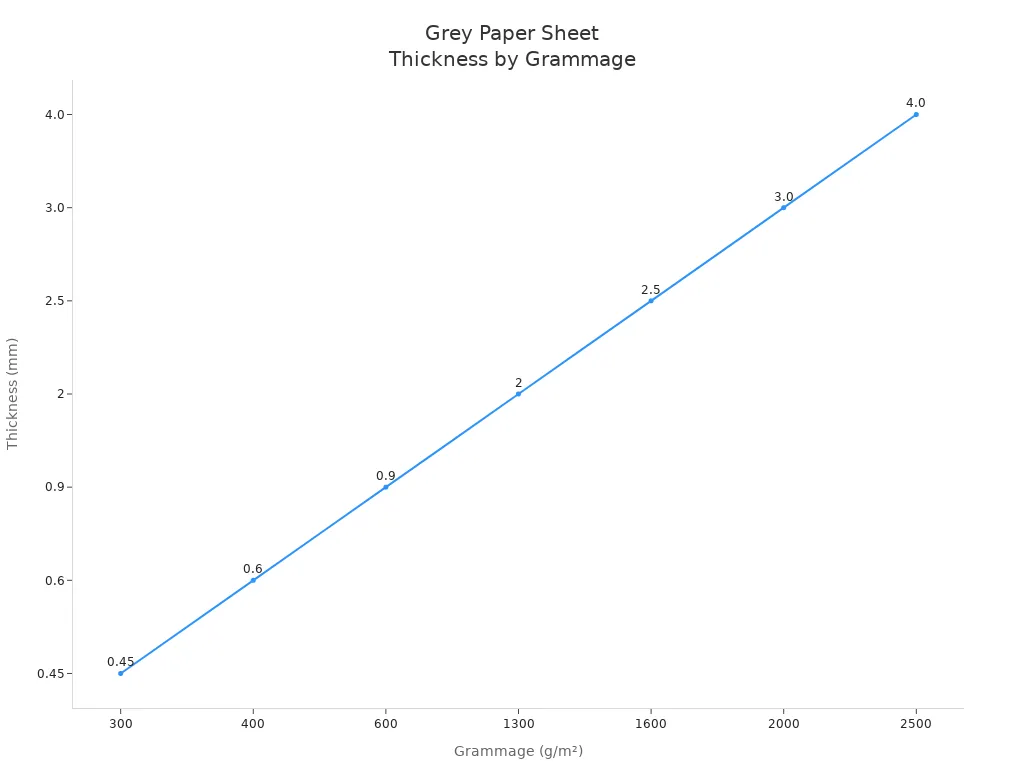
When you pick paper for your project, check its weight and thickness. These things change how your work feels and how long it lasts. There are many thickness choices in stores. Grey paper sheets come in thin and thick types. The table below shows how thick each grammage is in millimeters:
| Grammages | Thickness (mm) |
| 300 | 0.45 |
| 400 | 0.6 |
| 600 | 0.9 |
| 1300 | 2 |
| 1600 | 2.5 |
| 2000 | 3.0 |
| 2500 | 4.0 |
Pick the right paper weight for your project type. Lightweight paper is good for flyers and daily printing. Midweight sheets work for brochures and presentations. Heavyweight paper is best for business cards and fancy prints. The table below helps you see which thickness is best for your needs:
| Paper Weight Category | Description | Suitable Uses |
| Lightweight Papers (20-60 lb / 75-90 gsm) | Cheap, not great for top prints | Flyers, regular documents |
| Midweight Papers (65-80 lb / 100-120 gsm) | Nice color and strong | Brochures, presentations |
| Heavyweight Papers (100-110 lb / 200-300 gsm) | Great color and detail | Business cards, ads |
Tip: Use heavyweight sheets if you want your project to last or look fancy. Pick midweight for normal work.
Durability
Durability means how strong and thick the paper is. Thicker paper does not bend or tear easily. You need strong sheets for things people touch a lot. For model-making, use thick grey paper sheets. These sheets keep their shape and hold glue or paint well. For printing, match the paper to what you print. Coated paper looks shiny and protects the top. Uncoated paper soaks up ink and feels soft.
Here is a quick guide for matching paper to print jobs:
| Paper Type | Weight Range | Usability | Applications |
| Text Weight | 70# to 100# | Stops ink from bleeding | Brochures, catalogs |
| Writing Weight | 24# to 28# | Good for important papers | Letters, fancy notes |
| Cover Weight | 65# to 120# | Strong for tough jobs | Report covers, special items |
Note: Always test your paper with your printer or drawing tools before you start your project.
Grey Paper Sheets: Size Guide
Image Source: unsplash
Standard Sizes
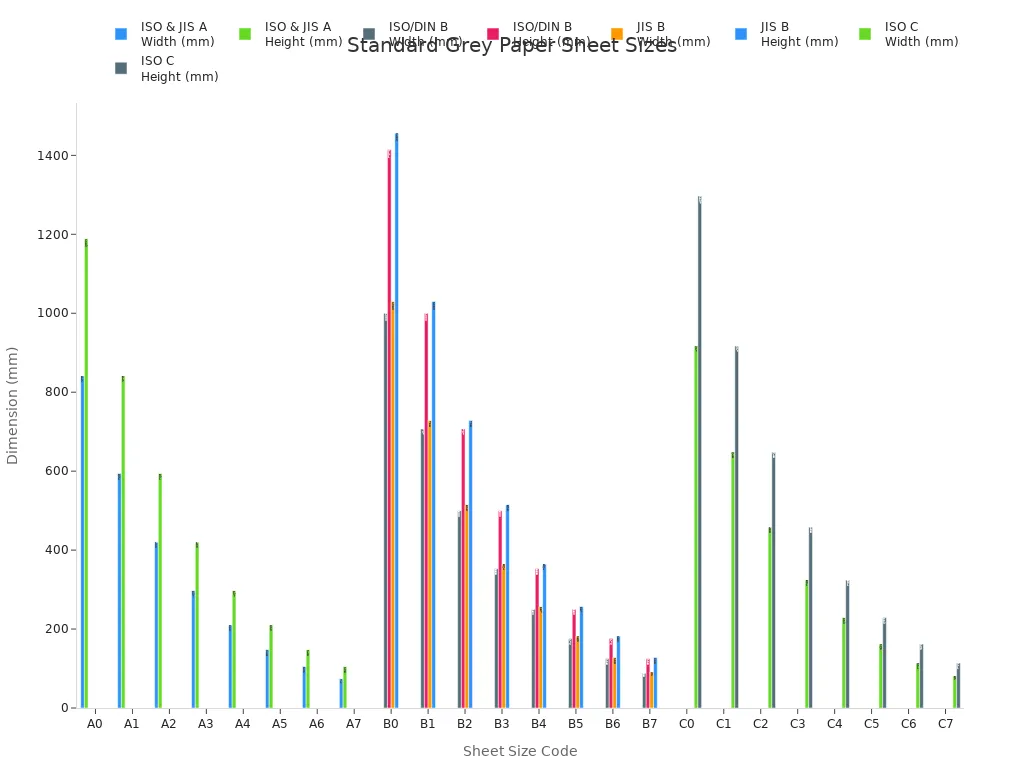
You can choose from many standard sizes when you work with grey paper sheets. These sizes help you match your project needs and make your work easier. Most people use international sizes like A4, A3, and A2. These sizes fit printers and cutters well. You can also find larger sheets for posters or packaging. The table below shows common sizes in inches and millimeters.
| Name | Width/Height (in) | Width/Height (mm) |
| A0 | 33.1 x 46.8 | 841 x 1189 |
| A1 | 23.4 x 33.1 | 594 x 841 |
| A2 | 16.5 x 23.4 | 420 x 594 |
| A3 | 11.7 x 16.5 | 297 x 420 |
| A4 | 8.3 x 11.7 | 210 x 297 |
| A5 | 5.8 x 8.3 | 148 x 210 |
| A6 | 4.1 x 5.8 | 105 x 148 |
| A7 | 2.9 x 4.1 | 74 x 105 |
Standard sizes make your work more versatile. You can use grey paper sheets for packaging, crafts, printing, and bookbinding. The neutral color and strong material fit many uses. Sizes like 700 x 1000 mm and 787 x 1092 mm work well for larger projects.
Tip: Pick a standard size if you want to save time and reduce waste. Standard sheets fit most machines and tools.
Custom Sizing
Sometimes your project needs a special size. You can cut grey paper sheets to fit your design. Start by measuring your space or template. Use a ruler or measuring tape for accuracy. Mark the lines with a pencil before you cut. Clean your cutting machine bed to reduce friction. Do not turn the sheets over during loading. Adjust the back gauge and lock it for many cuts. Cut large sheets down step by step. Trim the edges after cutting for a neat finish. Use a sharp knife and set the clamp pressure right to avoid mistakes.
Measure your sheet before cutting.
Mark your lines with a pencil.
Clean your cutting area.
Cut large sheets in steps.
Trim edges for a clean look.
Note: Custom sizing helps you match your project needs exactly. Careful measuring and cutting give you a professional result.
Evaluating Quality in Paper Selection
Finish and Texture
When you look at grey paper sheets, you see the finish first. You can pick matte or glossy finishes. Each finish changes how your project looks and feels. Matte finishes look soft and flat. Glossy finishes are shiny and reflect light. The table below shows how these finishes are different:
| Feature | Glossy Finish | Matte Finish |
| Surface Reflection | High reflection, shiny | Non-reflective, soft |
| Color Vibrancy | Vivid and saturated | Subdued and softer |
| Texture | Smooth and polished | Textured and non-glossy |
| Glare | Prone to glare | Anti-glare, easy to view |
| Fingerprint Visibility | Shows fingerprints easily | Fingerprints less visible |
| Durability | Easy to clean, more durable | Can show scratches |
| Common Uses | Photography, advertising | Fine art, professional prints |
| Aesthetic Appeal | Sleek and modern | Elegant and classic |
You should also think about coated and uncoated paper. Coated paper gives sharp contrast and a shiny finish. This is good for pictures and ads. Uncoated paper feels warm and natural. It works better for writing and projects that need a soft feel. Textured paper adds depth and makes your work special. Smooth paper helps show bright colors and fine details. Pick textured paper if you want your project to stand out. Choose smooth paper if you want clear images.
Tip: Matte finishes stop glare and make reading easy. Glossy finishes make colors bright but show fingerprints.
Absorbency and Compatibility
Absorbency changes how your paper works with pens, printers, and paints. Good absorbency lets colors stay sharp and not spread. Sizing controls how much water the paper takes in. Internal sizing keeps paper strong when wet. External sizing helps you paint without soaking the sheet too fast.
| Type of Sizing | Impact on Absorbency |
| Internal Sizing | Increases resistance to water, prevents breakdown |
| External Sizing | Controls surface absorption, helps with paint techniques |
If you want to write or draw, use uncoated paper. It absorbs ink well and gives a smooth writing feel. Coated paper is better for printing sharp images but does not work well with pens. Textured paper makes your drawings look deep and interesting. Smooth paper helps show bright colors and fine details. Match your paper to your tools and project needs.
Good absorbency keeps lines neat.
Sizing helps you control paint and ink.
Textured paper adds feeling to your art.
Smooth paper makes details easy to see.
Note: Always test your paper with your favorite tools before you start your project.
Color Matching and Visual Harmony
Tone and Project Feel
You can set the mood of your project by choosing the right tone for your grey paper sheets. Grey paper sits in the middle of the color spectrum. This means it can change how your colors and designs look. You need to think about how the paper’s tone will affect your project’s feel.
Adjust the contrast between light and dark areas. Grey paper has a mid-tone value, so highlights and shadows stand out more.
Pick colors and art mediums that work well with grey. The paper’s tone changes how colors appear. Bright colors may look softer, while dark colors can seem deeper.
Add highlights with white pencils, Posca markers, or gouache. These tools help your designs pop on non-white paper.
Tip: Test your colors and highlights on a scrap piece of grey paper before starting your main project. This helps you see how the final result will look.
You can use these methods to create a calm, bold, or elegant feel. For example, soft pastels on grey paper give a gentle look. Sharp black ink with white highlights creates a dramatic effect. Always match the paper’s tone to the message you want to send.
Audience Expectations
Your audience expects your project to look and feel a certain way. You can meet these expectations by picking the right type of grey paper. The table below shows how different paper types fit different needs:
| Paper Type | Characteristics | Example Use Case |
| Heavyweight | Feels thick and important. Shows quality. | Business cards for law firms to project authority. |
| Lightweight | Feels thin and affordable. Good for quick use. | Flyers for grocery stores to communicate value. |
| Glossy | Looks bright and eye-catching. Colors stand out. | Brochures for travel agencies showcasing destinations. |
| Matte | Looks soft and elegant. Reduces glare. | Exhibition catalogs for art galleries. |
Research shows that people keep heavier paper longer. Glossy brochures often get more attention than matte ones. You should think about what your audience wants to see and feel. If you want to impress, choose heavyweight or glossy paper. If you want to save money, lightweight paper works well.
Note: Matching your paper to your audience’s expectations helps your project succeed. Always consider who will see and use your work.
Paper Selection Tips
Checklist
You can make smart choices with a simple checklist. This helps you find the right paper for your project. Look at the table below before you buy grey paper sheets. You will see the main things to check.
| Attribute | Description |
| Sizes | Available in various sizes |
| Weights | Offered in different weights |
| Finishes | Comes in a range of finishes |
You should check the size to match your project. You need to pick the paper weight that fits your needs. You can choose a finish that looks best for your work. If you want to draw or write, uncoated paper works well. This checklist makes paper selection easy and helps you avoid mistakes.
Tip: Always review your checklist before you start your project. This saves time and money.
Mistakes to Avoid
You can avoid common mistakes if you know what to look for. Many people use simple rectangles instead of shaded blocks. You should use HWT Gray Block paper for better visual cues. Some forget to check if a child is ready for writing. You need to assess pencil control before using grey paper sheets. Spacing is important. Teach spacing between letters and words with the blocks as a guide.
| Mistake | Solution |
| Using simple rectangles instead of shaded blocks | Use HWT Gray Block paper for visual cues and support |
| Not considering the child's readiness for writing | Assess the child's ability to control a pencil before introducing gray block paper |
| Ignoring the importance of spacing | Teach spacing between letters and words using the blocks as a guide |
Note: You can improve your results by teaching spacing and checking readiness before you start.
You can buy quality grey paper sheets from trusted stores. Many online shops offer a wide range of sizes, weights, and finishes. Here are some places you can look:
You can find the right paper for your project at these stores. They offer many choices for artists, teachers, and designers.
You pick better paper when you think about thickness, size, and quality. Finish, texture, and color matter too. Choose paper that fits your project needs. This helps your work look special. You also make your audience happy when you:
Know what your audience likes to see.
Decide your project’s goal before starting.
Pick a style that matches your audience.
Change your work to keep people interested.
Listen to feedback to make your work better.
Follow the checklist and tips in this guide. You will feel sure when picking grey paper sheets. Your projects will look neat and professional.
FAQ
What is the best thickness for grey paper sheets when you want to print?
You should choose thicker grey paper sheets for most print jobs. Thicker sheets help your print look sharp and last longer. Thin sheets may bend or tear during print. Always test your print on a sample sheet first.
Can you use grey paper sheets for every type of print project?
You can use grey paper sheets for many print projects. They work well for posters, cards, and crafts. Some printers may not handle very thick sheets. Always check your printer’s guide before you print. Try a test print to see the results.
How do you stop ink from smudging when you print on grey paper?
You can stop ink from smudging by letting your print dry fully. Use the right print settings for your paper type. Choose a print with less ink if you see smudges. Matte finishes help your print dry faster. Always handle your print with clean hands.
Why does your print look different on grey paper compared to white paper?
Grey paper changes how your print colors appear. Colors may look softer or darker. The print may not look as bright as on white paper. Always test your print before starting your main print project. Adjust your print settings for the best results.


